Chapter 1
Preparation of DNA
printing plates
Task A: PCR Cocktail
Preparation
Objective:
Preparation
of mix to be added to yeast ORF specific primers for amplification of Saccharomyces cerevisiae genome ORFs
(~65 96-well plates)
Procedure:
- Prepare cocktail of PCR
buffer, magnesium chloride, dNTPs, Taq, etc. for four plates (=40 mL) in a
50 mL conical tube as follows:
|
|
One rxn |
Four
96-well plates |
|
RESGEN
ORF SPECIFIC PRIMERS: |
|
|
|
Forward
primer (20 uM) |
5
uL |
- |
|
Reverse
primer (20 uM) |
5
uL |
- |
|
10X
PCR buffer |
10
uL |
4000 uL |
|
MgCl2
(1 M) |
.05
uL |
20 uL |
|
100X
dNTPs (25 mM each) |
1
uL |
400 uL |
|
Yeast
genomic DNA (0.2 ug/uL) |
0.2
uL |
80 uL |
|
ddH2O
|
77.95
uL |
31.36 ml |
|
AmpliTaq
(5 U/uL) |
0.35
uL |
140 uL |
|
Total
volume |
100
uL |
90 uL aliquots |
- Mix well by inverting
tube
- Store at –20 C if not
to be used in less than 24 hrs (4 C if within 24 hrs)
Task B: PCR amplification of
yeast ORFs
Objective:
Addition
of premade PCR cocktail mix to yeast ORF specific primers, followed by thermal
cycling for amplification of yeast genome ORFs (~65 96-well plates).
Procedure:
- Pour cocktail into
disposable trough. Using
12-channel pipetman dispense 88 uL of cocktail to the pre-aliquoted
primers. Carefully mix by pipeting
up and down 3 times
- Place rubber mat over
PCR plate. Spin plate at 500 rpm
in table-top centrifuge, to remove air bubbles from mixture (very
important)
- Place plates in tetrad
PCR machine. Maintain same
orientation for all plates (eg, A1-12 always closest to back hinge) for
tracking heat block geographic problems.
Record plate/PCR block/time.
Closing lid of tetrad PCR machine: Design of tetrad lids promotes evaporation during PCR reaction, increasing failure rate. To close lid properly, tighten until lid lifts up off the body of the PCR machine, then loosen lid JUST until it again touches the body of the PCR machine. - Run program with the
following steps:
·
pre-melting 92ºC (1’)
melting 92ºC
(30")
annealing 56ºC
(45")
synthesis 72ºC
(3'30")
# cycles 36
·
soak
at 4-11ºC (hold forever)
- PCR reaction takes
approximately 3.5 hours
- Remove from PCR machine
- Store at 4 C if next
step is less than 24 hours away (-20ºC if need more time)
- Expect ~92-95% success
rate after first pass
- Following
characterization of success rate by running gels (see below),
re-amplify
failures.
Task C: Preparing agarose
gels for electrophoresis
Objective:
To
cast gels for running out products of each amplification reaction.
Procedure:
1.
Prepare
800 ml of 1% agarose in 1X TAE (200
ml/gel tray times 4 trays, each for one 96-well plate)
2.
Cook
in microwave or on stirring heat block until boiling.
3.
Allow
to cool to 55-60ºC
4.
Prepare
4 trays by taping ends well. Place four combs of 26 wells each into gel.
5.
Adjust
molten TAE agarose to 0.5 mg/mL ethidium bromide after having cooled to
~55-60ºC to avoid excess vaporization.
6.
Pour
200 ml of cooled molten agarose into each prepared tray (above 65ºC may warp
tray)
7.
Allow
to polymerize 20-30 minutes
8.
Store
in 1X TAE buffer containing 0.5 mg/mL ethidium bromide
Task D: Verification of PCR
success by gel electrophoresis
Objective
To
verify success of the PCR and also roughly size the products to verify
identity. High resolution on the gels
for exact sizing is not required, as this step is largely for quality control.
Procedure:
|
Agarose
gel: |
1%
agarose, 1X TAE, 0.5 mg/mL ethidium bromide |
|
Running Buffer: |
1X
TAE, 0.5 mg/mL ethidium bromide |
|
Loading dye (6X): |
15%
Ficoll-400, 0.25% xylene cyanol FF, 0.25% bromophenol blue |
|
DNA size ladder: |
4
mL 1X TE buffer, 1 mL 1kb ladder, 1 mL 6X loading dye |
|
1 |
Start
with 3 uL of PCR reactions in PCR plates, after remainder is transferred to
U-bottom plates (see next section). (can mix PCR + dye directly on parafilm
or in a fresh plate) |
|
2 |
Add
1 uL 6X loading dye to PCR reactions in PCR plates. |
|
3 |
Load
6 uL DNA size ladder in lane #1 of each row. |
|
4 |
Using
a 12-channel pipettor, load samples A1-A12 into alternating lanes 2, 4,...,
24. |
|
5 |
Load
samples B1-B12 into alternating lanes 3, 5,..., 25. |
|
6 |
Repeat
this procedure for the remaining samples, such that two sequential rows of
PCR reactions are loaded into a single row of wells in alternating lanes. |
|
7 |
Run
at 70-80V until the first dye band (XC FF) is halfway to the next row of
wells. |
|
8 |
Take
a high (~1") and low (~6/30") exposure photographs. Compare
to predicted ORF sizes and for the presence of significant doublets. |
|
9 |
Repeat
PCR rxns for failed ORFs. NOTE: For
2nd PCR attempt, sort failures by gene size, doublets, etc., and modify
reaction conditions accordingly. For
genes that still give PCR failures, design new primers, e.g. to amplify
subregions of genes. |
Notes:
- Loading gels: easiest to mix and load 24 wells at a
time. Aliquot 24 spots of 1uL gel
dye, add 3uL of PCR reaction, mix by pipeting, and then directly load 12
wells of the gel. Repeat this for
another 12 wells (i.e. two rows from the 96 well plate loaded into one row
of wells on the gel). Apply low
voltage while preparing other samples to prevent diffusion of the DNA
during loading.
- Running gels:
·
Do
not run short products (<300 bp) off the gel. To ensure this, run until blue dye is 2/3 down the gel.
·
b. During gel running, be sure gel is centered
in gel box and resting within the plastic frame: if the gel floats off the frame toward the cathode the DNA will
run out the BOTTOM of the gel leading to false negatives.
Tasks E-L: DNA Cleanup
Task E: Transfer of PCR products to precipitation
plates
Task F: Addition of isopropanol to PCR products
Task G: Precipitation of DNA by centrifugation
Task H: Aspirating isopropanol
supernatants
Task I: Addition of ethanol to PCR
products
Task J: Precipitation/wash of DNA by
Centrifugation
Task K: Aspirating ethanol
supernatants
Task L: Resuspension of dried ORF DNA
Objective:
To cleanup PCR products in preparing spottable DNA for arraying.
Procedure:
Task
|
Step
|
|
|
E |
1. |
[This
step is optional and we will not be performing it in this course. Instead, we will precipitate the PCR
products directly in the PCR plates.] Transfer
PCR reactions to 96-well U-bottom tissue culture plates (Costar #3790). |
|
|
|
If
gels have not been run, transfer 3 uL back to PCR plates for check gels (see
above). |
|
F |
3. |
Add
1/10 vol. 3M sodium acetate (pH 5.2) (10 ul to a 100 ul PCR reaction). Then add 1 volume (100 ul) isopropanol and
pipet up and down 3 times. Change
pipet tips between rows. |
|
|
|
Store
at -20ºC for a few hours to overnight (this is optional.) |
|
G |
4. |
Centrifuge
the plates in Sorvall at 3500 rpm (RC3B rotor) for 1 hr. If precipitating in PCR plates, use plastic
holders designed for PCR plates in order to support them during the spin. |
|
H |
5. |
Invert
plate over sink in order to remove supernatant. Alternatively, remove supernatant with 12-channel aspirator
(Wheaton/PGC Scientific #851388) |
|
I |
6. |
Add
100 uL of ice-cold 70% ethanol and centrifuge again for 30 min. |
|
|
7. |
Dry
the pellets in speed-vac for 10 min (if available). |
|
J |
8. |
Resuspend
DNA in 100 uL dH2O overnight. |
|
|
9. |
Transfer
in 10 uL aliquots to 384-well plates (Corning Costar #6502) to make 10 duplicate
print plate sets. |
|
K |
10. |
Dry
down print plate sets in speed vac (if available). |
|
|
|
Tightly
seal plates with aluminum foil (R.S. Hughes #425-3) for long-term storage at
room temperature. |
|
L |
11. |
Before
use, resuspend one print set in 4-5 uL 3XSSC and allow to hydrate overnight. |
|
|
|
|
|
|
|
|
Task M: Rearray into
384-well plates
Objective:
To reformat spottable PCR products from 96-well to 384-well plates, in preparation for arraying (converting from 9-mm to 4.5-mm well spacing).
Procedure:
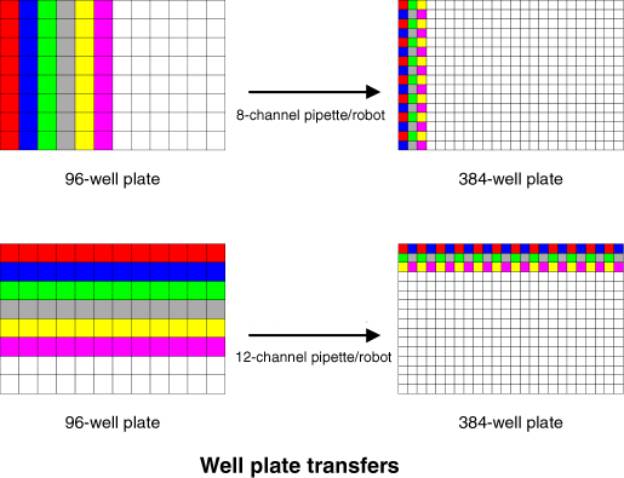
This
rearraying scheme ignores the most common 96 to 384 reformatting schemes,
namely ones which use robots with 96 tips (eg, Beckman Multimek, Robbins Hydra,
Tecan, Hamilton, etc.). These robots, fill a 384-well plate using four
interlaced 96-well registers corresponding to the 4 constituent 96-well plates.
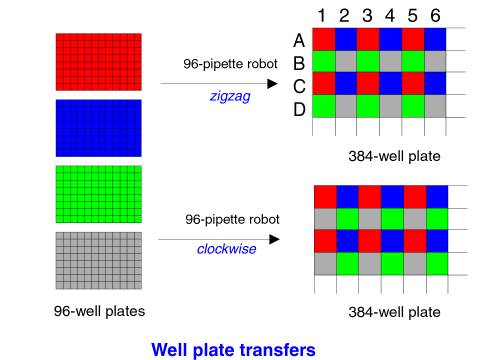
Most
commonly, this is done in one of two ways:
- "ZIGZAG",
Beckman Multimek's Default: 4 registers anchored at the top left (96-well
position A1) fill 384-well plate as follows: top left for register 1 is A1,
register 2 is A2, register 3 is B1, and register 4 is B2.
- "Clockwise",
Robbins Hydra's default: again, 4 registers anchored at the top left
(96-well position A1) fill 384-well plate as follows: top left for
register 1 is A1, register 2 is A2, register 3 is B2, and register 4 is
B1.
Other
schemes also exist:
Chapter
2
Preparing to print
Poly-L-lysine
coating of glass slides for microarraying
Glass slides can be treated with a variety of
coatings for attaching DNA to the surface, but in our experience, poly-L-lysine
coating is the most convenient and best performing method of attachment. Although it's possible to buy lysine coated
slides commercially, most of them are not as good as those you can make on your
own with adequate care. Many commercial
slides we have seen have dirt on the surface or uneven coatings of lysine.
The coating procedure consists of first cleaning
the slides thoroughly with a basic ethanol solution and rinsing, followed by
immersing them in a buffered solution of lysine. The slides are then rinsed briefly and spun dry to achieve an
even coating.
|
Materials |
Quantity |
Ordering information |
|
Glass microscope slides |
60 |
Gold Seal #3010 |
|
Slide rack with handle |
2 |
Shandon Lipshaw #121 (800-245-6212) Each rack holds 30
slides |
|
Slide chamber |
6 |
Shandon Lipshaw #121 |
|
Double distilled water |
~5 L |
|
|
NaOH |
70 g |
|
|
95% Ethanol |
420 mL |
|
|
Poly-L-lysine |
70 mL |
Sigma # P 8920 |
|
Tissue culture PBS |
70 mL |
|
|
Vacuum oven (45C) |
|
|
|
Slide box (plastic only) |
1 |
VWR #48443-806 |
Notes
Wear powder free gloves whenever you handle
slides in this protocol.
Directions
1. Rinse
the glass chambers with the metal slide racks thoroughly with distilled water
and get rid of most of the water by shaking & air drying. Place 30 slides in each slide rack.
2. Prepare
cleaning solution: Dissolve completely
70 g NaOH in 280 mL ddH2O. Add 420 mL
95% ethanol slowly and stir until completely mixed. The total volume is 700 mL
(= 2 X 350 mL). If solution remains cloudy, add double distilled H2O until
clear.
3.
Pour
cleaning solution into 2 empty slide chambers.
Use the wire handle to dunk the rack of slides into the solution, plunge
it up and down briefly and cover chambers with glass lids. Shake on an orbital
shaker for 2 hr. Once slides are clean, they should be exposed to air as little
as possible. Dust particles will interfere with coating and printing. You should also ensure that PBS solution is
made up at this point. (1 litre PBS has 8 g Sodium chloride, 0.2 g potassium
chloride, 1.44 g Sodium phosphate, dibasic, anhydrous and 0.24 g potassium
phosphate, monobasic)
4. Quickly
transfer racks to fresh chambers filled with double distilled H2O. While
transferring, tilt the rack to drain as much of the cleaning solution as
possible. Rinse vigorously by plunging racks up and down in the fresh
water. Repeat rinses at least 4 times
with fresh double distilled H2O each time. It is critical to remove all traces
of NaOH-ethanol. The slides remain in
the final rinse water till the next step, which is the lysine coating.
5. Prepare
poly-L-lysine solution: 70 mL
poly-L-lysine + 70 mL tissue culture PBS + 560 mL water. Use a plastic
graduated cylinder and beaker. Pour
this lysine solution into two clean slide chambers.
6. Transfer
the racks of slides from the rinse water to the chamber with poly-L-lysine
solution and shake for 1 hr on the orbital shaker.
7. Transfer
rack to fresh chamber filled with double distilled H2O. Plunge up and down to
rinse for about 1 minute.
8. Place
slides on microtiter plate carriers (place paper towels below rack to absorb
liquid). It is best to do this step (transfer from water to centrifuge carrier)
right at the centrifuge to avoid exposing the wet slides to air for any length
of time. Centrifuge for 5 min. at 500
rpm. This step ensures even coating and
drying of the slides. Transfer the
slide racks to dry empty chambers with covers for transport to vacuum oven.
9. Dry
slides in the racks (with cover off chamber) in 45 C vacuum oven for 10 min.
(Vacuum is optional.)
10.
Transfer
slides from the racks to a clean slide box.
The slides should look perfectly clean when inspected against the light.
Store slides in closed slide box (plastic only, without rubber mat bottom) till
they are ready for use in the printing process.
10.
Normally,
the surface of lysine coated slides is not very hydrophobic immediately after
this process, but becomes increasingly hydrophobic with storage. A hydrophobic surface helps ensure that
spots don't run together while printing at high densities. This may not be a problem with fine printing
tips and adequate spot-to-spot spacing, so the coated slides may be ready for
use in a day or two. After they age a
few days, (up to a week) they are probably optimal. The hydrophobicity can be tested by observing how a drop of water
beads off the surface (compare this to a just coated or un-coated slide). However, coated slides that have been
sitting around for long periods of time (few weeks) are usually too old to be
used. They often show opaque patches
when held to the light and these result in high background hybridization from
the fluorescent probe. It's useful to
test print, hybridize and scan sample slides to determine slide batch
quality. Inspect every slide before
placing it on the arrayer to ensure you don't use one that has obvious problems
like dirt, uneven coating or opaque patches.
Organization
(Group of 4 students)
Common
task-make PBS for everyone
|
Student
1 & 2 |
Wash
chambers, place slides in rack |
15
minutes |
|
Student
3 & 4 |
Make
cleaning solution |
|
|
|
Cleaning |
2
hours |
|
Students
1& 2 |
Make
poly-l-lysine solution |
|
|
Students
3 & 4 |
Rinse
4x, 1 rack each |
15
minutes |
|
All |
Poly-L-lysine |
1
hour |
|
Students
2 & 3 |
Rinse,
dry & store |
15
minutes |
Post-Processing of printed microarrays
After printing microarrays on
poly-L-lysine coated glass slides, the slides need to be processed before they
can be used for hybridization. Most
importantly, the remainder of the lysine coated surface needs to be blocked to
prevent non-specific attachment of the fluorescently labelled probe DNA to the
free amine groups. Blocking is achieved
by treating the surface with succinic anhydride (in an organic solvent), which
forms an amide bond with the free amines.
The processing step also rehydrates the array to make individual spots
more even and probably also denatures the DNA to some extent.
Materials Needed
|
Materials for 30 arrays |
Quantity |
Order info |
|
Humid chamber |
1 |
Sigma #H 6644 |
|
Diamond scriber |
1 |
VWR #52865-005 |
|
Slide rack with handle |
1 |
Shandon Lipshaw #121 |
|
Slide chamber |
2 |
Shandon Lipshaw #121 |
|
Succinic anhydride |
6 g |
Aldrich #23,969-0 |
|
1-Methyl-2-pyrrolidinone |
325 mL |
Aldrich #32,863-4 |
Inverted heat block (90-100 C)
Sodium borate (1M, pH 8), 15
mL Make this by dissolving boric acid
in water and adjust pH with NaOH
double distilled H2O ~1 L
2 L glass beaker
95% ethanol 350 mL
Notes
Wear powder-free gloves for the entire procedure.
Directions
1. Mark
the array boundaries: The spots on an array will become invisible after
post-processing as the salt gets washed away.
Since you need to know where to pipette the probe on, you have to mark
boundaries of the array. The best way
is to etch a couple of lines just outside the top and bottom of the array, on
the back of the slide using a diamond scriber.
If the arrays are not labelled, now is the time to do it. Labelling can be done with peel-off labels
or with the diamond scribe (see array printing). You need to be able to orient the array properly using the
labels.
2. Fill
the bottom of humid chamber with 100 ml 1X SSC. Place arrays face down over the 1X SSC in the chamber and cover
with lid. Spots will take up moisture
and swell. Re-hydrate until array spots
glisten, approximately 5-15 minutes.
This is best monitored by looking at the spots with a magnifying
glass. Allow the spots to swell
slightly but not run into each other.
Using a slightly warm solution (35-40 C) is one way to speed things up.
3. Quickly
transfer slides with their array side up, one by one from the humid chamber to
the smooth surface of an inverted heating block at 90-100 C. Snap-dry each
array for a few (3-5) seconds. You can
usually see a ‘wave’ of dryness sweeping across the array as the spots are
snap-dried.
4. Place
arrays in metal slide rack with wire handle. Keep it close to a clean, empty
slide chamber on an orbital shaker. Be
sure the rack is bent slightly inwards in the middle, or else the slides may
run into each other while shaking.
5. Prepare
blocking solution: Have three 350 ml glass chambers with lids available, as
well as a 2 L glass beaker or large round pyrex dish with double distilled
H2O to a height of about 3 in., just enough to cover the rack of slides. The water should be heated in the microwave
or on a heating plate to close to boiling.
At this time, prepare the 15 ml sodium borate in a 50 ml conical tube.
6. Dissolve
6 g succinic anhydride in approx. 335 mL 1-methyl-2-pyrrolidinone. The most efficient way to do this is to have
a clean 500 ml graduated glass beaker with a stir bar on a stir plate. Weigh the succinic anhydride and drop it
into the beaker. Pour
1-methyl-2-pyrrolidinone from the stock bottle into the beaker till it is
approximately 335 ml and turn on the stirrer.
7. Immediately
after the last flake of the succinic anhydride dissolves (about a minute), add
the 15 mL sodium borate into the still stirring solution.
8. Immediately
after sodium borate solution mixes in, pour the solution into empty slide
chamber on the orbital shaker. Plunge
slide rack rapidly and evenly in solution.
Vigorously shake up and down for a few seconds, making sure slides never
leave solution.
9. Shake
on orbital shaker for 10-15 min. Ensure that the water in pyrex dish or glass
beaker is maintained at a point just before boiling (95 C).
10. Transfer
the rack of slides from the blocking solution to the 95C water. Gently plunge
slide rack in hot water for 2 min.
11. Transfer
the rack of slides to a slide chamber with 95% ethanol. Plunge slide rack a few times in the
ethanol.
12. Take
the chamber with slides in ethanol to the centrifuge and transfer the rack to
the carriers. Load slides quickly and
evenly onto the carriers to avoid streaking.
Centrifuge slides and rack for 5 min. @ 500 rpm.
13. Transfer
arrays to a clean slide box. They are
ready for use immediately. Processed
arrays are good for many weeks.
Organization (Group of 4
students)
|
All (in turn) |
Etch slides |
10 minutes |
|
All (in turn) |
Rehydrate and snap dry |
20 minutes |
|
Students 1& 2 |
Blocking |
20 minutes |
|
Students 3 & 4 |
Transfer to water, ethanol
and dry, cleanup |
10 minutes |
PRINTING MICROARRAYS
A microarray printing run of more than a hundred
microarrays with many thousands of elements each is always a fun and rewarding
activity, but without the right attitude, it can become a chore that you
dread. A typical print run takes about
a day of non-stop printing depending on the number of printing tips and elements
to be printed. Someone knowledgeable
needs to be near the machine constantly to make sure everything is going
smoothly. Before you begin the run, you
need the following:
Notes
1. DNA
to be printed, aliquoted in printing plates:
It’s best to have this in 384-well plates. The best printing plates are Genetix 384-well plates (see DNA
prep and precipitation section for details).
For printing, the DNA needs to be in about 4 ul of 3X SSC. Obviously, you should know how the DNA was
aliquoted. The best method of storing
print plates is to dry them down. If
DNA in water was dried down, you need to add 3X SSC and if it was dried down in
3X SSC, you will be adding water. This
might seem like an obvious point, but when there’s a production pipeline going with
many people doing different steps, it’s easy to lose track! If dried down DNA needs to be resuspended,
add the water or SSC a few hours before beginning the print run. After it is resuspended, keep the plate
tightly sealed to minimize evaporative losses.
2. Familiarity
with the ArrayMaker software: You
should know how to do alignments and what the different parameters in the test
print and print window mean.
3. Glass
slides: You need plenty (~150) of coated glass slides from batches that have
been tested with test prints and hybridizations. See poly-L-lysine coating and test print sections.
4. Printing
tips: You should have many spares in addition to the 16 or 32 that you are
planning to print with. Obviously,
these should all be in good condition.
5. Other
materials: 3X SSC, double distilled water, test print DNA (100 ng/ul sheared
salmon sperm DNA in 3X SSC), ¼’ wide labelling tape, magnifying glass. Also useful is a dissecting microscope to
inspect printing tips, and a camera attached to a monitor that will let you
observe the arrays being printed.
Directions
Details for some of
the following steps are covered in the software section:
Turn on the main power and computer, run ArrayMaker and home
the stages
See the Mguide and
software section for details.
Align
all positions
It is necessary to make sure that all the
positions are correctly aligned at the start of every print run. Although none of the positions might have
changed, there’s always the possibility that someone had last printed with a
weird configuration of tips in a 32-tip holder and aligned that to the dry
station and print plate, or used a slightly different print plate. If you are not absolutely sure that all of
the positions are perfect, align everything.
It’s a good idea to make sure anyway. Clicking on the Align button on
the main window takes you to the align window.
In the Align window, clicking on the “Reset Z” button resets all the
vertical positions to the ready position, which is safely above everything. You
can then click on the buttons for the various positions and carry out
alignments. See the software section
for details on alignment. The tips in
the rinse station (sonicator) should be aligned with only the slot immersed in
the liquid. Remember to set and save
before exiting this window. If you are
printing with less than 32-tips (and using a 32-tip holder and dry station),
cover the unused holes in the dry station with a piece of tape.
Printing
tips
The quality of microarrays you print depends a
lot on the printing tips (the DNA in the printing plates is another major
factor). The current generation
printing tips pick up ~ 0.5 ml of solution and deposit a few nl with
every tap on the glass surface. A good
printing tip should be able to print 100-200 spots before it needs to be loaded
again. A good set of 16 or 32 tips
should produce uniformly sized, distinct, well spaced spots across the entire
array. Before beginning, inspect the
tips carefully for obvious imperfections under a dissecting microscope. You can observe how well a tip picks up
liquid by just touching the tip to the surface of a 3X SSC solution. With a good tip, you should see the solution
wicking up in the slot in the center of the tip. Make sure the outside is free of any salt or corrosive build-up,
especially at the retaining clip or inside the slot. Once the tips are in the holder and the top is on, use forceps or
needle nose pliers to make sure all the tips slide up smoothly and that the
spring pushes them back down when released.
You might need to clean the tip-holder holes of any build up. Gentle sanding of the outside of the tip
(where it rubs against the tip-holder) might also be called for
occasionally. Use a fine grade
sandpaper for this. If the shaft of the
printing tip is slightly bent, it affects the smooth up and down movement and
also alters the register of the different sectors of the test print array. If this is the case, replace the tip to get
a set that is well matched and evenly spaced.
Tips should be cleaned after every print run by sonicating in warm water
and rinsing with ethanol. Handle tips
with great care. Their points should
never hit anything hard except the slides while printing. Putting them in 200 ul pipette tips is a
convenient way to store them.
Test
prints
It is important to do test prints with the tips
that will be used for the print run, immediately before beginning the run. Tips that have performed well in the past
may gradually deteriorate with improper cleaning and other abuse. Load a sample print plate that is identical
to the real print plates with 4-5 ml test print
DNA in the top left 16 or 32 wells (beginning at A1) and use this for test
printing on slides from the same batch that will be printed on. The test print parameters (spacing and
number of spots across) should match what the real array is going to have. This can be calculated depending on how many
elements total you need to print (see software section for details). Tape down
a glass slide in position 1 on the platter (closest to the plate holder) for test
printing. If printing with 16 or 32 tips,
it’s very convenient to simply print 24 spots across in each quad. This way, one row of spots on the array
corresponds to 1 or 2 384-well plates and makes it easier to localize
imperfections to specific print plates.
However, this will limit the total number of spots you can print. You can set the tips to load multiple times,
which allows you to print thousands of spots on the same test-print slide. You can use the same wash and dry parameters
as for the actual run or shorten them slightly.
The liquid in the sonicator for cleaning the
tips can be either water or SSC (0.5 X or 1 X). Using SSC leads to somewhat better ‘priming’ of the tips and they
can then print more spots before running dry, but depending on the DNA in the
print plates, it could also lead to spots that tend to spread. You should do a test print run using a spare
sample plate of the actual DNA that will be printed to see how different wash
solutions affect the spot quality. Do
test prints from different load positions on the 384-well plate to check the
plate alignment, and on different slide positions on the platter to check the
slide height adjustment on the platter.
Use of the plate positioner is strongly recommended.
Printing the real microarray
Once you have a
set of printing tips working perfectly on the test print, start the array print
run immediately. Set the print
parameters in the Print Array window.
To prevent carryover on the tips, it is necessary to do at least 3
cycles of cleaning, with 5-6 sec sonication and 8 sec dry times. A few other things to note: You of course know how many printing plates
total you have, but set the spacing so that you have room for more. Printing a plate of controls is useful. The
control plate can include l DNA, salmon sperm DNA, poly dA, Cot1 or
other low complexity repeat containing DNA, genomic DNA, 3X SSC, clones
corresponding to doped in controls, dilutions of fluorescently labelled cDNAs,
etc. as positive and negative controls. You should also try to leave room for
re-printing a few plates should there be a problem with some of them.
When all the parameters are properly set, you
are ready to begin. Spray off the dust
and glass shards on the platter and wipe the surface with a moist kimwipe. Place your slides (wearing powder-free
gloves) on the platter, making sure they are aligned straight and lying
flat. If printing less than 137 slides
(a no-no!) you should fill the platter in the order they will get printed. Use the ¼’ tape to tape down all slides
along the edge. Don’t put the tape on
top of the dowel pins on the platter.
Use pieces of tape to tape across columns. Taping securely is important as you don’t want your slides moving
around during the print run. Place the
dust cover on as soon as you are done taping the slides down.
Spin down every print plate just before putting
it into the plate holder. You want to
ensure there’s no liquid on the sides of the wells. Be careful when taking off the seal. Make sure the plate is placed in the proper orientation in the
holder. Again, the plate positioner helps.
You will have a spreadsheet listing the contents of each well in the
printing plates. The order and orientation
on the slide platter determines where each DNA is going to end up on the array,
and only you can keep track of this.
It’s very useful to keep a log at the arrayer where the orientation and
plate number of every plate can be recorded for each print run. When everything
is ready, drop the first plate in and click the start button!
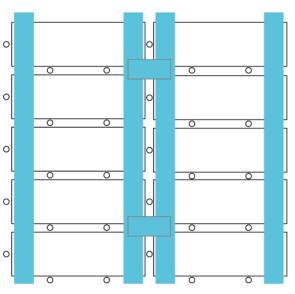
Taping diagram
Monitoring
the run
Close monitoring is essential throughout the
run. A live CCD camera with a macro
lens or attached to a microscope, and hooked to a monitor, makes things a lot
easier. You basically need to ensure
that all the tips are printing well on all the slides. It’s sometimes necessary to use the reload
feature if some tips are unable to print till the end of the platter. Often, the first few slides have larger
spots; this is normal. If they begin
running in to each other a lot in the beginning of the platter, you might want
to turn on the blot pad feature. Check
the level of liquid in the sonicator every few plates. In case of printing problems, you can stop
the run after making note of the plate and load number. Then remove the first slide, put in a fresh
one, and do a few test prints (with test print DNA) and diagnose the
problem. Is a single tip printing large
spots? The tip could be blunted or the
slot could be misshapen or something could be clogging the tip. Look under the scope and try cleaning it
gently. Has a tip stopped printing?
Make sure it continues to slide smoothly up and down in the holder and that
it’s touching the slide on the test print.
Are all the tips misbehaving? It
could be due to salt or corrosive build up on the tips. You can move the stage to the right to
immerse the tips briefly in warm water, and then inspect them. After this make sure the tip holder bottom
holes are dry and free of crud. Are
some isolated slides on the platter missing spots? Maybe the Z-height has not been corrected for those
positions.
Remember, many
seemingly disastrous runs are salvageable.
If a bad tip problem crops up in the middle of a plate, and you lose a
lot of spots on the array, you can print that plate again at the end of the run
if you’ve managed to fix the problem. It’s usually not worth ‘filling in holes’
on the array as you have to keep careful track of which slides are missing
which spots and so on. It’s far easier
to reprint an entire plate at the end, which is why it’s good to leave room for
a few extra plates. When you stop and
start up again, make sure that the printing starts exactly where you stopped by
entering in the appropriate values for the current plate, slide and load in the
Print window. Stopping a print run to
catch some sleep at night is unseemly.
Tag team instead and carry on the through the night. You’ll get the arrays faster that way.
Ending the run
Once all plates are
printed, you can begin another run immediately with the same print plates. If you are not up to that (or if you don’t
have enough fresh slides), it's best to dry down the plates in the speedvac and
seal them for the next run. The first thing
though, is to remove the slides and clean the tips. Carefully peel the tape off the slides without touching the
surface of the arrays. It helps to have
an extra person to hold down one edge of the slides while the other peels tape
from the other end. Alternatively you
can use the edge of a long strip of metal like a ruler to hold down the slides
when the tape is pulled off. Some
people like to label the slides at this point, especially if using stick on
labels. Put the printing tips in fresh
warm water in the sonicator and clean for a few minutes. Inspect tips for any corrosive or salt crud
inside the slot. Cleaning with ethanol
may also help. Store tips dry.
Chapter 3
Microarray Hybridizations
Harvesting Cells from Liquid
Culture
This is a very simple protocol for collecting yeast cells from
liquid culture, basically just chilling, spinning, and freezing.
Reagents
Collection tubes
Pre-chilled centrifuge
Liquid nitrogen
Ice
Directions
(1) Fill a collection
tube with ice, so that there is as much ice in the tube as there will be
sample.
(2) Pour the sample
into the tube. Mix by shaking.
(3) Pellet the cells
by centrifugation.
(4) Decant, and freeze
pellet by submersion in liquid nitrogen.
(5)
Store at –80 C.
Notes
There are many different variations on this protocol. The key elements are to stop gene expression
quickly, by cooling or freezing. The
method also works well if a fast spin (<3 min) is used and the samples
remain at their experimental temperature.
Generally longer spins with ice to chill the cells are the easiest way
to go.
RNA
Preparation
RNA preparation is one of the most important steps in expression studies. RNA that is undegraded and free from contaminants will work well when labeled cDNA is generated later. We have found that acid phenol methods are robust and easy. The general goal is to quickly take frozen cells and add hot phenol which will break open the cell wall and separating nucleic acids from unwanted cellular components. It is generally helpful to perform the extractions multiple times to ensure that high quality RNA is prepared.
Reagents
Water
saturated phenol Solid phenol,
melted and saturated with water
Sodium
acetate buffer 50
mM sodium acetate, 10 mM EDTA pH 5.0
10%
SDS
chloroform
95%
ethanol
70%
ethanol
Isopropanol
Water
bath at 65 C
Vortexer
3M
sodium acetate pH 5.3
de-ionized
water
Directions
(1) Fill phenol resistant tubes with 10ml
phenol.
(2) Add 9ml sodium acetate buffer and 1ml
10% SDS.
(3) Immerse in 65 C bath, until heated.
(4) Warm frozen cell pellets to ~ 0 C.
(5) Add 1ml phenol/buffer mixture to each cell pellet, returning
each mixture to the larger tube and then vortex for 10s.
(6) Heat at 65 C for 7-15 min, vortexing for
10s every 1-2 min.
(7) Centrifuge to separate phases (about 10
min, 3,000 g).
(8) Remove aqueous to second tube containing
10ml phenol.
(9) Vortex briefly, separate phases again.
(10) Remove aqueous to third tube containing
5ml phenol, 5ml chloroform.
(11) Vortex briefly, separate phases again (15
min, 3,000g).
(12) Transfer aqueous to a fourth tube.
(13) Add 1/10th volume sodium
acetate, and either one volume of isopropanol, or two volumes of ethanol.
(14) Centrifuge to precipitate RNA (~30 min,
3,000g).
(15) Wash RNA pellet with 70% ethanol.
(16) Dry pellet at room temperature.
(17)
Re-suspend
RNA in water. Store at –80 C.
Notes
Again there are many variations in protocols. Increased yield can be obtained by lengthening the hot phenol step, or by pelleting the cell debris and reextracting it with more hot phenol. Phase-lock tubes (5’ -> 3’ inc) are a useful way to make the separations easier (and reduce them). It is relatively important to quickly get the frozen cells into the phenol/buffer mixture to prevent gene expression changes.
Amino-allyl
Labeling of cDNA by Reverse Transcription
The amino-allyl based labeling procedure is far more cost effective, and yields fluorescent probes that are much brighter than can be obtained by direct incorporation. There protocol is somewhat longer, but the efort is worthwhile.
I.
RT Reaction
Oligo
dT/Random Prime RNA:
|
|
Concentration |
uL |
|
Oligo dT:pdN6 |
5ug/uL |
1 |
|
Total Vol. of RNA |
|
14.5 |
Incubate
RNA and oligo dT at 70° C for 10 min.
Chill
on ice 10 min.
|
1x dNTPS: |
|
|
500uM each dA, dC, dG |
|
|
200uM aadUTP 300uM dTTP |
|
|
50x recipe: FOR 2:3 |
|
|
10uL each dA,dG,dC |
|
|
4uL aa-dUTP |
|
|
6uL dT |
|
cDNA
synthesis
|
|
Concentration |
uL |
10.5 |
|
5x buffer |
|
6 |
63 |
|
50x aa dUTP/dNTPs |
|
0.6 |
6.3 |
|
DTT |
0.1M |
3 |
31.5 |
|
SuperScript II |
|
1.9 |
19.95 |
|
Water |
|
3 |
31.5 |
|
|
|
14.5 |
14.5 |
|
42 degrees for 2
hours |
|
Aliquots |
|
II. Hydrolysis
Add: 10ul 1N NaOH
10ul
.5M EDTA
Incubate:
15 min. at 65°C.
Neutralize: 25ul 1M Tris
pH 7.4
III. Cleanup
To continue with the
amino-allyl dye coupling procedure all Tris must be removed from the reaction
to prevent the monofunctional NHS-ester Cye dyes from coupling to free amine
groups in solution.
Fill one Microcon 30
concentrator with 450 ul water.
Add neutralized reaction.
Spin at 12K for 8 minutes.
Dump flo-thru.
Repeat process 2X,
refilling original filter.
Elute.
Dry eluate in speed vac.
IV. Coupling
Resuspend cDNA pellet in
4.5ul water.
Resuspend monofunctional NHS-ester
Cy3 or Cy5 dye:
If using aliquot,
resuspend in 4.5ul .1M NaBicarbonate Buffer pH 9.0
If using fresh tube of
Cy3/Cy5, resuspend entire tube in 72ul water.
Aliquot 4.5ul x 16 tubes
and dry in speed vac.
Resuspend aliquot in 4.5ul
.1M NaBicarbonate Buffer pH 9.0 as above.
Mix dye and cDNA.
Let incubate 1 hour at RT
in dark.
V.
Quenching and Cleanup
Before combining Cy3 and
Cy5 samples for hybridizations, the reactions much be quenched to prevent cross-coupling.
Add 4.5ul 4M hydroxylamine.
Let reaction incubate 15 min. at RT in dark.
To remove
unicorporated/quenched cye dyes proceed with Qia-quick PCR purification kit.
Combine Cy3 and Cy5
reactions.
Add 70ul water.
Add 500ul Buffer PB.
Apply to Qia-quick column and
spin at 13,000 rpm in for 30-60 sec.
Aspirate off flo-thru.
Add 750ul Buffer PE and spin
30-60 sec.
Aspirate off flo-thru and
repeat.
Aspirate flo-thru and spin for 1 min. at high speed to dry
column.
Transfer to fresh epp. tube
Add 30ul Buffer EB to center
of filter and let sit 1 min. at RT.
Spin at 13,000 rpm for 1 min.
Repeat elution step again.
VI. Hyb. Prep.
Dry
down Qia-quick eluate in speed vac.
Bring volume to 18
ul with water.
Add: 3.6ul 20X SSC
1.8ul polyA(10mg/ml)
Optional: filter in Millipore 0.45micron spin column.
Add: 0.54ul 10% SDS.
Incubate reaction at 100° C for 2 min.
Apply to prepared microarray.
Probe preparation by direct
Cy-dNTP incorporation
Preparing labeled cDNA from RNA for expression
studies may seem complicated but it is one of the simplest molecular
techniques. The major necessary
components, RNA, RT, and fluor-dNTP are relatively straightforward to use. Generally, RNA and a primer that will be
used to initiate reverse transcription are mixed, heated (to allow annealing),
and chilled. A cocktail of enzyme,
buffer, etc… is made for each of the fluors, and added to the RNA mixture. The RT reaction is allowed to proceed, until
the two probes are prepared to be mixed, when EDTA (and NaOH) is added to
prevent DNA production. The next key
step is that the unincorporated fluor needs to be removed by using a centricon
filter (which retains molecules with a certain MW or greater, 30 kD works
well). This purified cDNA is ready to
be used as a probe.
Reagents
RNA
Olgio dT 1.5 mg/ml (~18mer)
65 C heat block
42 C heat block
100 C heat block
0.1 M DTT
First strand buffer
Reverse transcriptase (Superscript II)
Labeling mix 25
mM dATP, 25 mM dCTP, 25 mM dGTP, 15 mM dTTP
Cy3-dUTP
Cy5-dUTP
Stop solution 1
N NaOH, 0.1 M EDTA
Neutralization solution 1 N HCl
Centricon-30
TE
Water
Directions
(1) Aliquot
15 ug of total yeast RNA or up to 2 ug of polyA+ RNA into each reaction tube
(0.5 ml or 1.5ml).
(2) Add
6 ug (for total) or 4 ug (for polyA+) olgio-dT.
(3) Heat
65 C, 1 min.
(4) Chill
on ice.
(5) Make
a master mixture of:
6
ul first strand buffer
3
ul 0.1 M DTT
0.6
ul labeling mix
3
ul Cy-dUTP
2
ul reverse transcriptase
for
each reaction.
(6) Add
14.5 ul of master mix to each RNA/oligo-dT sample.
(7) Incubate
at 42 C for two hours.
(8) Add
1.5 ul stop solution.
(9) Heat
10 min 65 C.
(10) Add
1.5 ul neutralization solution.
(11) Mix
differentially labeled sample in a centricon-30.
(12) Add
400 ul of TE.
(13) Centrifuge
9 min at 14,000g.
(14) Empty
flow through and add 500 ul water.
(15) Centrifuge
until 5-10 ul remains above the membrane
(16) Collect
labeled cDNA.
Notes
Several
different steps can be excluded or included from the protocol presented
here. Degradation of the RNA by adding
the stop solution is probably unnecessary, as is neutralizing the stop solution
directly. A vast excess of TE will do
the trick. One step that seems
important is to keep the reactions to 30 ul, changing the volume of the
reaction can affect the heating/cooling steps resulting in changes in the
representation of the cDNA produced or available for hybridization. Probes can usually be stored overnight in
the refrigerator.
Microarray hybridizations
Reagents
Labeled cDNA
20X SSC
10% SDS
2.5% SDS
20 mg/ml yeast tRNA
Microarray
Cover slips
Hybridization chambers
Water
Directions
(1) Add
2 ul of 20X SSC to labeled cDNA mixture
(2) Add
1 ul of tRNA.
(3) Add
1 ul of 2.5% SDS
(4) Bring
final mixture to 14 ul.
(5) Insert
microarray into chamber, placing 10 ul water at one end of the chamber.
(6) Pipet
cDNA mixture onto center of array.
(7) Place
a cover slip over the array, prevent bubble formation.
(8) Close
chamber, place in 65 C bath for 4-24 hrs.
(9) Remove
chamber from bath and array from
chamber.
(10) Carefully
place array into slide holder in 1X SSC, 0.2% SDS.
(11) Shake
slowly until cover slip falls off.
(12) Plunge
slide ~20 times, transfer to 0.4X SSC, plunge ~20 times, transfer to 0.2X SSC,
plunge ~20 times.
(13)
Spin
array dry in centrifuge at 600 rpm.
Notes
There are more tricks to this protocol than a dog
could ever learn. Everybody does it
differently and it doesn’t seem to make a substantial difference. Some of the interesting differences are…
(1)
cover
slips- glass, plastic, beveled edges…
(2)
hybridization
volume- 10, 12, 14, 20 ul or more.
(3)
Various
blocking agents (repetitive DNA, oligo dA…)
(4)
Cover
slip placement (dropping, tweezers…)